Saturday, 22 October 2016

CAUDALIE INSTANT DETOX MASK


As much as it was imperative for me to find the right cleanser and moisturiser for my sensitive, reactive skin, it was equally as important to find the right face mask. As I am a self-proclaimed makeup addict, I am forever trying out makeup and layering my skin with products which may look great, but they do clog up your sebaceous glands which in turn can lead to unwelcome breakouts. That’s why it is important for me to use a detox face mask at least once a week to give my pores a thorough cleanse! 

I first tried the ‘Caudalie Instant Detox Facemask’ when I got a sample of it from a magazine. I’m not one to rip out samples, but I am a massive advocate of brands that use natural ingredients in their products. I know Caudalie is a reliable brand when it comes to my skin, as they cater to sensitive skin and I also love their ‘Vinosource Moisturising Sorbet’ however, the thing that intrigued me the most about this mask was the ‘Pink Clay’ as detox masks are traditionally a charcoal grey colour. 

Gorgeous 'pink clay' 

The main ingredients in the mask are pink clay, grape marc and coffee. The pink clay and coffee are designed to clarify and even out the complexion, and the grape marc will help detoxify and tighten pores. Do I believe in this formula? Yes, 1000%! Also, to add to my love of this mask, it is noticeably scented with Lavender, which would make sense as it contains lavender, parsley and chamomile. These ingredients are renowned for helping soothe and calm the skin, which makes it a perfect mask for pampering evenings, as the lavender scent gives it that spa like feel. 

0% parabens and nasty ingredients!

I was surprisingly blown away by the results when I first used the sample because I don't usually see instant results from face masks. It recommends that you leave the mask on for 6-10 minutes, but I will usually leave it on judging by how my skin feels. There is a slight tingle when you first apply it but nothing too overpowering. I left it on for the full 10 minutes as it felt comfortable and when I took it off I was honestly amazed!!! My skin looked radiant, felt calm, and my pores appeared noticeably smaller. 

I've never encountered a mask that made such an impact on my skin days after I've used it too! My pores were smaller and tighter, the active hormonal breakout that I had was flatter and easier to conceal with makeup, and my skin looked more even and clearer. I tend to always try different masks, and I rarely stick to just one but knew I had to buy this in full size once I’d finished my current one. 

It really saved my skin (and sanity) a couple of months back when I had a horrible breakout. Nothing was getting rid of my unwelcome new friends, and my current mask was just not cutting it. Off I went to my local pharmacy, which luckily stocks Caudalie, and bought it with great desperation. I paid £22, and you get 75ml of product, which I think is great value for money as the mask lasts a long time because you only need to apply a thin layer. I've had mine for over six months now, and it's not even reached halfway yet. Buy here!

Me here absorbing the goodness:)

I'm a great believer in investing wisely on your skincare rather than makeup, as the condition of your skin can determine how you feel about yourself and also impacts how your makeup appears on your skin.

Now, at first, I was a little alarmed when I used it on my face, which was suffering from a recent breakout, as the mask forced some stubborn pimples to come to the surface, but luckily, they disappeared within a couple of days. I used it twice during that week, and it played a huge part in helping my skin heal and restore itself back to normal. I use this mask just once a week now before I go to bed and apply the 'Vinosource Moisturising Sorbet' afterwards, to add moisture back into my skin. These products are a match made in heaven and leave your skin feeling and looking as soft and plump as a baby’s in the morning. Buy here! 

The after effects of using this mask on your skin are nothing like I’ve ever seen before. It’s not just a mask to me but also a treatment. It tightens and shrinks my pores for days after I’ve used it, reduces my breakouts to nothing and makes my skin look like I've had a glycolic peel or a spa treatment. I have a lot to thank for this mask, and it has without a doubt become my favourite mask of all time!


What’s your favourite face mask? 
SHARE:

Sunday, 16 October 2016

HOW TO GET RID OF ACNE SCARS AND WRINKLES AT HOME!


Acne scars and wrinkles

We all know that getting lines and incurring acne scars from pesky spots is a sad part of life unless you are have skin from the gods than in that case I’m extremely envious! Although I have managed to get my skin to a good place where I get the odd breakout here and there, I have some minor acne scarring from my teenage years. 

As I have mentioned, my skin is annoyingly sensitive, so I have to be extremely careful about what products I use on it. I once had an Isolaz treatment which consists of a vacuum suction device designed to extract bacteria and excess sebum from your pores. I have not had such a severe reaction in my life! I looked like a spotty tomato and did not want to leave the house until I looked more human again and less like a tomato. 

After doing some research and finding the right products (which I've mentioned in my previous posts) I have managed to get my breakouts under control for around four years now and have fortunately had minimal breakouts. Although I am happy with my skin overall, I have always been on the hunt to find a product to help wth old acne scarring and to prevent wrinkles. Off course, I did the common thing and brought expensive serums, but they were just not cutting it for me and wanted something more efficient. 

After my treatment horror, I was put off with having any more treatments and wanted to take matters into my hands. I heard that derma rolling was the new modern way of rejuvenating the skin by rolling small needles over the skin to create thousands of minuscule contact points which in turn helps to stimulate collagen to encourage production of new, clearer and younger skin. If you do this privately, you will need several of these sessions to see results, and they cost £100 per session depending on the clinic. 

Tinsky Derma Roller 


Although I like the concept of this treatment,  I wasn't prepared to pay all that money to a risk of my skin potentially reacting badly. I started doing some research on home kits for derma rolling treatments and stumbled across the ‘Tinsky Derma Roller’. There were many different derma rollers, but the ‘Tinsky Derma  Roller’ had great reviews and was top rated. After reading the reviews which were mostly positive and reassuring, I decided to give it a go as it is only costs £5.99 reduced from £19.99 including delivery Buy here!I have to say that I am extremely glad I hit that buy button and so is my skin! 


The ‘Tinsky Derma Roller’ is designed very well and feels a lot more luxurious than what I paid. It comes in a sturdy plastic case where you can store it after use. The needles are 0.5mm in depth and do not hurt in the slightest. You feel a slight tingle and sting when rolled over your skin but nothing too uncomfortable. It states it can use this on your body also, but I like to stick to my face as I want to target my scarring. I do not suggest to use this if you have active acne or open pores. 

I have been using this for over two months now so have a had a good chance to form an opinion and allow results. I started off by using it twice a week but only use it once now as I find that two can be quite abrasive. I usually derma roll before I go to bed and apply my ‘Luna Sunday Riley Sleeping night oil’ afterward as it contains Retinol which is designed to fight wrinkles and correct skin damage. This oil is amazing on its own but used in combination with the Tinsky Derma Roller is a match made in heaven! Buy here!


Now you don't have to use this exact oil as I'm not going to lie, it is pretty pricey, and you can just use your favourite serum or oil. I do highly recommend to use one which is formulated to help even out your skin tone such as serum or oil containing vitamin C or hydrologic acid as one of the benefits of using a derma roller is that any product used afterwards is absorbed more efficiently and the ingredients will work in 10 folds overnight! 

How I use the Tinsky Derma Roller


Step 1- Spray alcohol solution onto the derma roller before use and leave to soak for 3-7 mins. You can use any solution that contains alcohol as you want to ensure it is clean. I Like to personally use this spray as it is quick and easy to use and super affordable. Buy here!  
Step 2- Make sure your face is clean and dry before you start to use it.
Step 3- Start rolling the derma roller onto your face focusing on one section at a time. Use it in different directions to ensure each part of your skin is covered. You may want to test it on the back of your hand before use to adjust to pressure you to feel comfortable using. 
Step 4- Apply rejuvenating serum or oil as after treatment. A vitamin C serum is recommended alongside this product for best results. 
Step 5- Spray disinfectant alcohol spray after use 
Step 6- Allow your skin to heal and restore itself after using again. 

Vitamin C serum I like to  use Buy here!
My verdict

So as I’ve mentioned, I’ve been using this 'Derma Roller’ for over two months now and felt it is best to test something for at least six weeks before I form an opinion on it. Although, in all honesty, I saw results with this product after just three uses. I never get complimented on my skin and after using it the 1st time I got complimented on how great it looked and was question ‘how I have such good skin’? It was a fantastic compliment as I’ve always had to work for my skin to look ‘good’. I immediately noticed how even and clearer my skin looked in the morning and that my makeup went on smoother and looked more flawless. 

Astonishingly, I have also seen a reduction in the depth of my scars on checks and the scars are virtually unrecognizable on one side of my face. I am more comfortable with leaving the house without makeup to run errands whereas before, and I  had to wear some form of coverage before leaving the house. 

You will have to be persistent with using this, and I feel finding the right after treatment enhances the results but for the price compared to clinic prices this product is defiantly worth a go right?! As a skincare ‘connoisseur’ I would without hesitation recommend this if your a person who likes to do things themselves without spending extortionate amounts of money and are looking for a device to diminish old acne scarring naturally. 

Have you tried at home derma rolling yet? What are your tips for getting rid of acne scarring? 
SHARE:

Saturday, 8 October 2016

SOS FOR CHAPPED, FLAKY LIPS


As soon as it hits autumn, not only do I contract a horrendous cold without fail, but my lips become extremely dry and flaky: (Now if you’re a lover of liquid lipsticks, then you will feel my pain. Let's be honest, no lipstick looks pretty over chapped, flaky lips.

After years of attempting to save my lips so I can wear my favourite autumnal shade of red, I have finally figured out a step by step regime that has saved my lips and the best thing about it is that all these products are super affordable :)

Step 1 - Scrub, scrub, scrub…


There’s nothing more irritating than sore, flaky lips, however, after many trials and tribulations I’ve found an easy way to get rid of this irritating little problem in no time. I picked up the ‘Mint Julips lip scrub’ from Lush on a whim, not actually thinking much of it but this little scrub is a MUST HAVE in everyone's beauty collection. There’s also a bubble gum flavoured one, but I’m a sucker for anything minty and invigorating.


Firstly, allow me to just take a moment to praise the gorgeous minty and sweet smell, we all know Lush products smell delectable! You can literally taste the peppermint and sweet vanilla flavour on your lips and it's really hard not to want to eat it whilst scrubbing away. You only need the smallest amount to gently massage onto your lips for around 30 seconds to a minute. It then suggests licking it off, which, let’s just facing it, you would definitely do or you can just wipe it off. 

So you may be thinking that exfoliating chapped lips may leave them sore or dry, but the outstanding thing about the Lush lip scrubs is that they contain caster sugar and jojoba oil which is known for its soothing and moisturising properties, so it will leave your lips feeling smooth and refreshed even after exfoliation. You can use it as many times as you like due to the nourishing ingredients. I like to use this at least twice a week to keep flakiness at bay.

Step 2 - Mask it

I normally prefer to use my Lush lip scrub as part of my evening skincare routine before bed. Once I have exfoliated my lips, I like to slather on coconut oil and treat it as an overnight hydrating mask. The one I like to use is the ‘VIta Coco’ 100% raw virgin coconut oil and it’s comforting to know that I won’t be applying anything that contains nasty ingredients near my mouth.


Coconut oil is renowned in the beauty world for targeting a multitude of issues such as dry skin and (my personal favourite) dehydrated hair. As well as using this as a lip mask, I also love to use it as an overnight hair mask and you know me, I like a multi-use product. Not only do I wake up with soft and replenished lips, my hair is also silky smooth and ready to wash. Buy here!


Next time you are having a pamper evening, dig out your coconut oil and give it a go:) You will wake up feeling like you’ve had an overnight pamper session.


Step 3 - Add moisture!

So we covered the preparation for getting rid of the unsightly flakiness, but it’s just as important to maintain the suppleness we have created and keep our lips moisturised. The product that I can't live without and I have at least three lying around at all times off is the Blistex ‘MedPlus’ lip balm.


This is the best lip balm I have ever tried and I have tried them all! I thought the Calmex ‘Lip balm’ was the best thing since sliced bread until I tried the Blistex ‘MedPlus’ and I have not looked back since. 

The thing that gravitated me into buying this lip balm was the word ‘MedPlus’. My lips were extremely chapped at the time, to the point where they were bleeding so needed some extra TLC. After researching the ingredients of this amazing little lip balm, I discovered that it is, in fact, a medicate lip balm containing my favourite ingredients for moisturising, Jojoba Oil, Cocoa Butter and Menthol to soothe and cool your lips.

I use this lip balm all year round, as I genuinely love how it makes my lips feel. I am addicted to the tingling medicated feeling that it gives my lips and it really does relieve my lips from any dryness. Applying this lip balm is equally as important in my beauty regime as applying mascara. I am just not complete without it and have converted many people to this addictive lip saver! Buy here!


So what to take from this...


You do not have to go for the exact products or routine that I’ve mentioned (although they are amazing) but I would say the ingredients are key in helping you heal and restore your lips. Coconut Oil, Jojoba Oil and some peppermint or menthol base ingredients are what help me transform my lips from flaky and distressed to kissable in 3 easy steps.


What are your favourite products for rescuing distressed lips?


SHARE:

Thursday, 6 October 2016


ABOUT ME


Hi! My name is Elena and I am currently living in London which I LOVE! I started this blog back in May 2016 and it is the best decision I've ever made! I've had a passion for all things beauty related for as long as I can remember!  I recall once crying hysterically when I forgot my makeup bag at home and my poor mum had to bring it into school so I would stop (tut-tut).  Being a beauty enthusiast from a young age, I've had the opportunity to find some real gems and discover amazing beauty secrets which I enjoy sharing on my blog and plan to continue:). I am loving every minute of writing for my blog and I am excited to get inspired plus continue to learn along the way. I hope you enjoy reading my posts and get some inspiration. Please feel free to contact me with any questions xx


I

SHARE:

Sunday, 2 October 2016

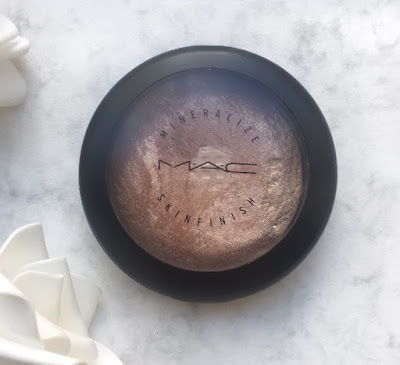
MINERALIZE SKINFINISH | SOFT & GENTLE


As you may have gathered by now after reading my posts, I am a creature of habit. I don't like change and if I find something that works well for me, then I will hardly ever stray. ‘MAC Mineralize Skin Finish’ in ‘Soft and Gentle’ is no exception. This may be hard to believe as so many amazing highlighters have come onto the market but, I have been using this highlighter for 3 years now and have not felt the urge to purchase any other!

Now please excuse the fact that my ‘Soft and Gentle’ is still in its old packaging and I probably shouldn’t be using it due to the fact that it might have expired but, it still does the job and that’s all that matters… right? Also, just to point out that after using it near enough every day for the last three years, it only hit pan a month ago! You get a whopping 10g worth of product, so it comes as no surprise. I think that it’s definitely worth the £24 price tag, which is quite reasonable compared to other high-end highlighters on the market at the moment. Buy here!


Now, onto the awesome product itself. It is marketed as a Mineralize Skin Finish powder which is designed to add radiance to the face and body using its 77-mineral complex, (not sure what 77-mineral complex is, although I’m sure it contributes to the beautiful metallic effect that it gives). I personally have never used it on my body but can imagine it looking beautiful on the décolletage area on holiday or with a healthy tan. 

This is described as being 'Gilded Peach Bronze’ in colour, which I would somewhat agree with although, I also feel it has frosted champagne tones with slightly pink undertones running through it. I would say it is suited for all skin tones but would probably complement medium to olive skin tones best due to its beige, pink undertones.


I personally like to use this to highlight on the tops of my cheekbones, down the centre of my nose and on my forehead, using the Real Techniques Setting Brush which you can buy here lookfantastic.com. When applied with this brush, it really does melt onto my skin and gives off a beautiful metallic finish like nothing else. As it is so pigmented yet finely milled, a little goes a long way. In fact, it’s hard not to want to smear it all over your entire face, due to the angelic ‘lit from within’ velvety glow that it gives. It really adds that much-needed dimension to my face making it the perfect finishing product. 

The 'Real Techniques setting brush' is my favourite to apply it with
I occasionally use this as an eyeshadow if I am going for a quick eye look and it looks great with a simple winged liner. I also love to apply this in my inner tear duct and under my brow bone, as it really helps to open up my eyes and pulls any eye makeup look together. Who doesn't like a multi-purpose product when they’re on the go?! 

Lastly, I would like to address the lasting power of this little gem. Wow, can this product last?! I kid you not, it still looks the same as when I applied before I left the house, no need to reapply, which is why it’s such a fail-safe highlight. It is perfect for taking you from day to night and can be used on casual days with a light hand or layering it up for nights out.  If I am going out for the evening, I like to intensify it by spraying a little ‘MAC Fix Plus’ setting spray over to make it pop even more. 

As I've mentioned before, I haven’t tried any other highlight and this has been my one and only for the last 3 years. As a self-proclaimed beauty addict, have I been tempted? Of course, but I have not had the urge to purchase anything else as this product 
has everything you need and has exceeded any expectations I had. This product is like magic on my skin and really does complete any makeup look I go for, giving me a gorgeous metallic radiance. 

I will go as far as to say that if I had to use only this product to highlight for the rest of my life then I’d be happy with it and that’s saying something. Give it a swatch next time you're at a MAC counter to witness the beauty in action and I will guarantee that you will not be leaving the shop without it. 

Have you tried this Mineralized Finishing Powder? What are your thoughts? 
SHARE:
Blogger templates by pipdig