Thursday, 29 September 2016

ANASTASIA BEVERLY HILLS CONTOUR KIT/LIGHT-MEDIUM


I've owned the ABH Powder Contour Kit in light to medium for a while now and seeing as I've had a good chance to play around with it I thought I'd provide an honest review. Although I like to write about products that I am truly passionate about, I also reckon it's important to give reviews on products that I may not be as blown away by too. I am aware that many makeup gurus adore this product, and all I read is glowing reviews, but I have a slightly different opinion about it. 

At first, I truly didn't get on with this contour palette, I found it was annoyingly difficult to blend and would make my cheekbones look muddy! I was even considering selling it on ‘Depop’ as I felt sourly disappointed due to it being rather pricey, but I thought I'd persevere, as it may look better when I came back from holiday and had some colour on my face. 

I wouldn't say I am in love with it now, although, it has been a slow burner as I have discovered multiple methods of using it that work well for me. Who says it should only be used for contouring your cheeks right?! 

The Palette


The palette itself is presented in a smooth matte black magnetic case, which secures the six highlight and sculpting shades. For a product that is on the pricey side, I am not too impressed with the quality of the packaging. As you can ascertain in the images, it gets dirty very quickly and the writing is wearing off, not to mention the scruffiness of the packaging. Also, when it arrived, my initial thought was where is the mirror?! 

The six highlight and contour shades sit in a round magnetic pan which is detachable and I feel is the only redeeming element of the packaging, as the pans can be refilled. The palette is split with three shades designed to contour; ‘Havana’, ‘Fawn’ and ‘Java’ and three shades for highlight; ‘Sand’, ‘Banana’ and ‘Vanilla’. 


They are all matte shades, apart from the highlight shade ‘Sand’ which contains slight glitter particles, but nothing too extravagant, though, I would have preferred it had as I like my highlight to have that glow factor. 

I use ‘Banana' to set the concealer under my eyes and also on my eyelids to set my eyeshadow primer, which I feel it’s amazing for. I have hardly used ‘Vanilla’ as I've failed to find a purpose for it :(  Please let me know if you have any suggestions? 

As I've mentioned, although the shades are highly pigmented I personally find them difficult to blend out and can look patchy on me. The only way I have found the contour shades to work for me is when I layer them on top of my ‘Estée Lauder Bronze Goddess’ which you can buy here at lookfantastic.com. I apply the bronzer on my cheekbones and mix ‘Java’ and ‘Fawn’ to apply over the top of my bronzer et voilà, no more patchiness! You can purchase the palette here at Cult Beauty.


Some other ways I found that work for me are when I apply it with the ‘Real Technique Contour Brush’, which has soft bristles so it will not pick up a lot of product, as opposed to a dense brush. By applying it over the bronzer with that brush, I can appreciate the beauty of how pigmented it is without looking like Kim Kardashian went wrong! 


I also feel that if you have quite dry skin like I do, it is important to prime your face before so the contour can sit seamlessly on your skin. I personally love to use the Benefit ‘Porefessional’ primer, when going for a heavier look as it really helps everything glide on smoothly.


Multiple Use 

As this palette has made it into my everyday makeup bag, I discovered other ways to use it other than contouring my cheekbones. Dare I say that I love to use this palette more as an eyeshadow than contour and highlight.

As the pigment is so beautiful, I really find it easier to blend out on my eyelids, maybe due to the fact that they contain more oil. I typically put ‘Sand’ (the highlight shade) all over my lids and as mentioned before, I like to set my primer with the ‘Banana’ shade. I then take ‘Havana’ in the crease of my lid and blend it out. This creates a really quick and easy everyday look with the shades lasting well in the eyes, perfect for long working days.
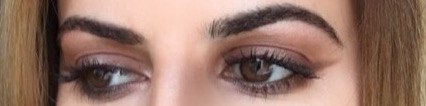
Everyday simple and quick eye makeup look using the ABH kit

I also like to use the palette for contouring my nose. Especially If I am creating makeup looks for my Instagram page and want to look extra fancy. I will then go ahead and use ‘Fawn’ to draw out the contour line on my nose using an angled eye makeup brush and then take ‘Banana’ down the center and sides of my nose. Now, you must remember to blend the lines out well to avoid looking like you drew on your nose! To finish it off, I like to add ‘sand’ (highlight shade) down the center and the tip of my nose and there you have it, a faux nose job in mere minutes! 

Here me wearing 'thaw' over the 'Estee lauder bronzer'

To conclude and as noted before, the pigment is stunning, but I do feel the blend-ability factor is lacking, for me. Saying that, it may apply better on oilier skins, as mine is quite dry so please take that into account. Luckily, I have found ways to make it work for me over time, so, in the end, I have made it worth my while. 

As this was one of the first contour kits that came into the market after Kim Kardashian made contour and highlight the craze, I have yet to try other alternative contour kits, so have nothing really to compare this with. 

What is your favourite contour kit and what do you recommend I try next?


SHARE:

Saturday, 24 September 2016

TOP TWO MOISTURISERS FOR DRY SKIN


This is an obvious analogy but I believe that wearing the right moisturiser is just as important to how your skin looks as wearing the right foundation, if not MORE vital! How your skin looks and feels like underneath the makeup will determine how your makeup will sit and appear on the skin.

Having quite dry and sensitive skin, I always struggled to find a moisturiser that won't break me out and will give me enough hydration. Being the skincare addict that I am, I can admit that I have tried more moisturisers than any other beauty product! I finally found my ‘Holy Grail’ face wash but was finding it quite difficult to be satisfied with any moisturiser. 

It wasn't until a few years ago when my skin had a quarter life crisis and went from oily/combination to very dry that I started to do my research on good moisturisers specifically for dry/sensitive skin. After trying countless expensive moisturisers, which claimed to perform miracles but failed to give enough hydration and would break me out horrifically, I discovered two lifesavers, which I’ve been using for over three years now!


REN EVER CALM GLOBAL PROTECTION DAY CREAM 


Purchasing this moisturiser should have been an obvious choice for me as I am hopelessly devoted to the ‘Ren Evercalm Cleansing Milk’ which you can Buy here! It was only when I received a mini sample when I reordered the cleansing milk, that I had a ‘Where have you been all of my life moment?!’ 

The ‘Ren Evercalm’ range is specifically designed for reactive and sensitive skin that can get easily irritated from environmental pollution. It’s also designed to help soothe and calm sensitive skin and is made from only naturally active ingredients. I liked the concept that it is designed to make sensitive skin less reactive over time.  

The best thing about Ren is that it caters to all skin types and they really do put thought into the ingredients they use in their products, which is why I love the brand so much! If you order from their website, you can get 10% off your product for life and 2 free generous sized samples to help you get a good reflection of the product and also it makes for a nice size to give to friends and family to try.

Now onto the moisturiser itself! As with the cleansing milk, this made my skin so happy! It has a subtle florally scent but nothing too overpowering. I immediately noticed that it soothed my skin reducing any redness and made it look more even in colour, especially on my cheeks where I get most of the redness. 

I would say that it is a relatively rich cream but is not thick and oily like most rich moisturisers, which have the ability to make you look like a disco ball. One pump is more than enough and I like to spend about a minute to really massage it into my skin to get the optimal hydration. I would advise this step when using thick moisturisers as if they are not messaged properly it tends to just sit on your face and make it feel tacky without motorising to its full potential. 

As I've mentioned previously, I love the fact that they use naturally active bio extracts, some which have names that I cannot pronounce let alone mention but the ones that stand out to me are Omega 3 and 7 which are renowned for helping fight skin irritation and inflammation. It also contains Bisabolol an extract designed to help fight redness by soothing and restoring your skin. 

I gave my friend who has rosacea the small sample as she was on the hunt for a new moisturiser, she absolutely loved how it calmed down her redness that she ordered the full size. I can imagine that this can be a great moisturiser for a multitude of skin issues. You can buy it here at lookfantastic.com. 


EUCERIN DRY SKIN REPLENISHING FACE CREAM 


This is a real hidden gem and I feel that every dry skin sufferer needs to know about this cream. I cannot say enough good things about it! I don't feel that EUCERIN as a brand is given enough praise in the beauty world. Although I was overjoyed when I heard one-half of Pixiwoo Sam Chapman sing the praises of this moisturiser and also state that this is her current favourite. 

I alternate between this and Ren Evercalm but reach for this when my skin is feeling tight and flaky as it instantly diminishes my rough and tight skin and makes a beautiful base to apply my makeup on. It is also great to apply after treating your skin to a detoxifying face mask or after using a drying spot treatment, as it provides the much needed subtle moisture back into your skin. 

As I am a true lover of products that are not heavily loaded with ingredients, due to my sensitive skin, this stood out to me as it is Fragrance and Colourant Free which is an important factor to look out for if you suffer from reactive skin! It also has a clever science as it contains 5% Urea which is designed to help restore and maintain the moisture levels of your skin in the long run by improving the skin’s ability to retain moisture. 

As this moisturiser contains lactate which is a prominent ingredient to help soothe dry skin, you would think that it may leave you skin feeling greasy, however for a product that contains both lactate and Urea it is surprisingly non-greasy and needs less massaging into the skin than the Ren Evercalm as it is easily absorbed by the skin instantly making my dry, rough and flaky skin a thing of the past. 

Eucerin is also approved and suggested by many dermatologists to use on eczema-prone skin and I can imagine it to be great to use when taking any skin drying medication due to the instant hydration and the fact that it’s fragrant free with minimal ingredients. The best thing about this moisturiser is that it won't break the bank either, as you can pick it up at your local Boots store for only £11! You also buy it here Eucerin Dry Skin Face Cream 50ml. 


I think that I’ll be reaching for the Eucerin more this winter as I feel it is more effective at treating weather agitated skin and sinks into the skin slightly better than the Ren Evercalm. Although they are very similar in the sense that they treat your skin in the long run, by training your skin to maintain natural moisture and reducing reactivity. 


If you haven't already given them a go and are struggling to find a moisturiser that will soothe your dry and irritated skin then look no further as I am convinced that one of these great moisturisers will be the one you're looking for! 


What’s your favourite moisturiser for dry and sensitive skin?


SHARE:

Friday, 9 September 2016

BLUSH-A-LICIOUS


Blush-a-Licious


If I’m not wearing bronzer, then I will for sure be wearing blusher! Although they both have different effects, wearing the right blush takes you from looking flat to fabulous in seconds. 

I remember back when blusher was the craze before contour and highlight took over the makeup world. Who remembers rummaging the Sleek counter trying to find that perfect blush shade? I believe I may have shamelessly bought the entire shade range. My bank balance may have suffered, but I discovered that peachy pinks compliment my light olive skin complexion the best. 


I like to add a light dusting of blusher to the apples of my cheeks to give me a natural ‘blush’ and add life back into my face. A bit of blusher is an essential step for minimal makeup days when you don't want to do the whole contour shebang but still want to give your skin some life and colour. 

In my opinion, a blush should not be applied to give your face definition, as a bronzer would, and less is more unless you like the garden gnome look! 

After having a good play around with many blushers, I have whittled down my favorites to Just two! One is on the higher end scale, and the other is a lot more affordable, both equally as desirable. 

NARS Orgasm Blush

Although we all know the name is questionable, this blusher is a cult classic for a reason. I didn't intend to buy this blush, but as NARS were doing a two products for £50 deal in House of Fraser, I just had to purchase this blusher to see what the hype was about. 


'Gorgeous and Glistening!'

Glisten!

My first impression was ‘Oh wow, this is quite glittery!’ which made me a tad skeptical; as sparkly cheeks weren't something I was keen on. Although it does contain glittery particles, these blend out once applied to the cheeks, which give you the most beautiful healthy sheen. 

I would say the colour is a warm pink with a tinge of peach accompanied by the gold particles. I like to apply it using my dense ‘Eco Tools Blush Brush,' which I've had for years. As this blush is quite sheer, a dense brush is the best way to apply it as it will pick up more pigment over a soft brush.

If you’re someone who likes their blush to be pigmented, then this is not for you. Although this blush is quite sheer, the quality is still impeccable making it easy not to go overboard but also having a lasting effect. 

Duo effect 

I feel this blush can act as both a highlight and blush, making it perfect for a ‘no makeup, makeup day’ or if you are in a rush, as it gives you that popping dewy glow because of the gold pigments.

Wearing Nars 'orgasm'


It is also a MUST if you are a red lip kinda girl as the warm pink does complement a red lip and pulls everything together. A simple ponytail, fine flicked eyeliner, Orgasm blush, and red lip, (usually MAC’s Russian Red) is a winning combination, in my eyes. 

To summarize, this is a perfect blusher if you are new to the whole blush application, as the warm pink can complement a multitude of skin tones and makeup looks. Do yourself a favour and pop it in your basket when you’re doing your next ASOS shop. 


Milani Luminoso Baked Blush

Milani Luminoso was the only blush I wore every day for a whole year before I discovered NARS Orgasm, now I alternate between the two. I have used this blush so much that the packaging no longer has writing and the dome shape is slowly disappearing. I believe that every girl should have this blush in her collection.

'Baked and Beautiful'


This blush is predominantly a warm peach with a tinge of pink and slight gold shimmer. As the name ‘Luminoso’ would suggest, this blush gives the cheeks a subtle ‘lit from within’ glow but nothing as obvious as ‘Orgasm’. If you like a subtle glow in your blush, then this is the one to go for over ‘Orgasm’. 

I like a bit of radiance in my blush so if I’m feeling for more of a glow, I reach out for ‘Orgasm’. 


Luminous but pigmented!

Don’t be fooled by the luminosity of this blush as the pigment is insanely intense! Although ‘Luminoso’ is a dream to blend, a very light hand is highly recommended as it’s easy to go a bit too overboard and can be difficult to remove. To avoid going OTT, I like to apply this with my Real Techniques Blush Brush as it picks up the right amount of product. 

As I've mentioned, I like to wear ‘Orgasm’ with a red lip, but I tend to reach for this blush if I’m going for a nude lip and smokey eye. This and MAC’s Shy Girl or Velvet Teddy is simply a dream team. 


Wearing Milani 'Luminoso'

Cruelty-free

As Milani is an American brand, it is not so readily available in the UK, but the good news is that you can purchase this on Amazon for under £10 which you can Buy here!

What is your favourite high-end or affordable blush?


SHARE:

Sunday, 10 July 2016

MY TOP 10 MOST VERSATILE MAKE-UP BRUSHES


As I’m a self-proclaimed makeup fanatic, I believe I own more makeup than I do shoes. Ever since my love for wearing foundation grew, so did my collection of makeup and brushes. It got to the point where I had nowhere to store them!

I started off gradually buying all of the collection of Real Technique Brushes, as they have very much been raved about by many beauty bloggers and YouTubers. I wanted to start off with brushes that were of good quality but also affordable so that I could get used to applying makeup with brushes. You will find that the Real Technique brushes will make quite an appearance in my top ten :) 

As I’ve mention in my Urban Decay Palette blog post, during my trip to New York (where I bought a hell a lot of makeup), I also purchased some MAC and Morphe makeup brushes, which again had a lot of praise in the beauty world. 

I must say, I was not disappointed with any of my purchases and a lot of the products I bought during that trip have all been gems! 

Right, so let us get onto the brushes. I have listed what I use each one for and you’ll notice that most of them aren’t used for any of their actual purposes, but that’s the beauty of experimenting right?

Foundation 


Real Techniques Sculpting brush

This brush is designed at a flat top slant to help sculpt and define a contour. As this brush is extremely dense, I find it hard to blend out contour products, so I’ve discovered another use for it, which is to apply foundation! It applies on so quickly and helps to give a beautiful flawless finish due to the density of the brush. Buy here!


Morphe M439 (Deluxe Buffer Brush) 

After hearing Jacqueline Hill - one of my favourite beauty gurus -rave about this brush, I knew it had to be mine. If I could choose one foundation brush to have for the rest of my life, it will be this one. It is a lot shorter than most foundation brushes, which gives you a lot more control of the application. It has extremely soft yet dense, dome-shaped bristles, which seamlessly blend foundation on like a dream. This is also a great brush to grab when you are in a rush. Buy here!


Bronzer/Blusher 


Real Techniques Blush Brush


I find that bronzers and blushers are one of those products you can go a bit overboard on if you don't use the correct brush. This brush is tapered cut, which is great for getting into your contours. As the bristles are really soft, you have no fear of it picking up a lot of product and end up looking a bit like a circus clown. Instead, it makes it easy for you to lightly build on the product. Buy here!


Contour 


Morphe M405 (Contour Blush Brush) 

This is an angular shaped brush, which is made up of goat hair bristles. It is designed for the application of blush and contour. I personally LOVE to use this if I am going for a light contour due to its ultra softness and angular shape. It really does get into the contour and creates a subtle, natural focus.Buy here


Real Techniques Contour Brush 

Designed to apply highlight to the cheekbones but I like to personally use this if I’m going for a heavier contour. The fact that it’s domed and has quite a small brush really helps define your cheekbones for a more dramatic look. I also like the fact that it’s not too soft or dense but somewhere in the middle which helps blend out the product seamlessly without creating any harsh lines. Buy here!


Highlight 


Real Techniques Setting Brush 

I feel that this brush is made specifically for me to apply my beloved MAC Soft & Gentle Highlight. It is a rather small brush and has superset bristles, which are perfect for fitting into my cheekbones and creating a gorgeous highlight. You can also use this to set your makeup with a dusting of powder, but another way I like to use this is to blend out my concealer due to the coverage that it gives. Buy here!


Setting brush


Real Techniques 300 (Gold metals) Tapered Blush Brush


This is the only brush I own from the gold collection, but it’s so versatile that it has satisfied my craving of purchasing any more. Firstly, can we take a moment to appreciate how beautiful it is? It has silky soft bristles that come to a tip, which I feel makes it effortless to pick up product and concentrate on the area for blending. I like to use this to set my Laura Mercia Translucent Powder on my t-zone.Buy here! 


Concealer 


Real Techniques Base Shadow Brush 


This brush comes in a starter kit for your eyes and as the name would suggest is used to apply the base for your eyeshadow, but of course, I have found another way to use this. This is a Godsend when it comes to covering any pesky blemishes. Buy here!


Eyes 


MAC 217 

The infamous eyeshadow blending brush and rightly so! I feel that if this was the only blending brush you owned in your collection then you will be set for life. I have tried many blending brushes but there’s something about the quality of the bristles that blend eyeshadow into the crease like nothing else! The way it’s tapered also makes it easy to get right into the crease of the eye. 


MAC 239

You can create both a natural or heavy eye makeup look with this brush as it picks up the pigment of the eyeshadow very well for a heavy look or you could sweep it across your eyes for a natural look. 

Both the MAC 217 & 239 brushes are worth investing in, as I have tried cheaper alternatives and they do not compare. I would say good eye makeup brushes are the foundation of any good eye makeup look. 

I can easily get by with all of these brushes indefinitely as I tried and tested many, but I am always on the hunt for new brushes, as quality brushes can really change the way your makeup is applied and looks. 

What are some of your recommendations? 


SHARE:

Friday, 24 June 2016

THE BEST AFFORDABLE FOUNDATION


That is a bold a statement, right? I only review products that I am truly passionate about and have tried and tested. After several years and countless bottles, I can confidently say that this is the best affordable foundation I have ever tried and beaten a lot of the higher end ones too!

I never used to wear foundation on a daily basis, only my Estée Lauder Double Wear on special occasions. I was on the hunt to find a foundation I could comfortably wear on a daily basis. 

Having quite dry and reactive skin, I always found it difficult to find a foundation that I could wear with ease, without the fear of it shamelessly clinging on to dry patches or breaking me out. 

Before trying the ‘Healthy mix foundation’, I first bought the ‘Healthy mix serum’ as I liked the concept of having something with the coverage of a foundation but had a gel like texture to glide over my dry skin. I read that it was also hypoallergenic, which is something you should look out for if you have skin that is prone to breakouts. 

I absolutely LOVED the ‘Healthy mix serum’! Finally, a foundation that did all the things I hoped it would! I religiously wore the foundation for a few months and once I got used to having foundation on my skin, I wanted to try something that provided a bit more coverage. 

I was sceptical if the ‘Healthy mix foundation’ would live up to my expectations as it had the texture of a foundation but I was pleasantly surprised and fell in love with it straight away. I was addicted to how radiant and flawless it made my skin look!

Texture 

I feel that one of the best qualities about this foundation is that it is super blendable. It has a smooth and light texture, which glides over any dry patches beautifully. I like to apply this using the ‘Real Techniques Sculpting Brush’, as it is dense and really intensifies the satin like look that it gives skin. 


Finish

The idea of this foundation is to give the effect that you have naturally radiant and dewy skin, yet it still has a semi matte finish which is hard to come by when it comes to radiance boosting foundations. It definitely gives me that healthy glow without my skin looking too shiny.

Coverage 


Although it has quite a light texture, I would say that this a definitely a straight up medium coverage. I wouldn't say you can get a full coverage, although the great thing about this foundation is that you can apply several layers, and it will never look cakey!

  
Covers up any redness &imperfections beautifully

Lasting power

It claims to last for up to 16 hours! I am not sure if I have kept my foundation on for sixteen hours unless I have “accidentally” fallen asleep with it on, but it does last a good 5 hours  before it starts to wear off. If I set it with a good powder then it can stay for up to 6 to 7 hours which in my opinion is not bad going for the price. 

Colour range 

There are 8 shades to choose from which are vanilla, light vanilla, light beige, beige, dark beige, light bronze, bronze, dark bronze. I find it difficult to find a foundation which caters to skin with a yellow undertone and I can confidently say that I have found a perfect shade match. If you have olive skin, I am sure that one of these shades will be perfect for you! 


Comparison/Dupe

I have only worn the Armani ‘Luminous Silk Foundation’ a couple of times through testers, but the similarly is uncanny. It has a beautiful satin and velvety texture, which glides on like a dream, same as the healthy mix. The only difference is that the Armani ‘Luminous Silk Foundation’ is a tad bit thicker, which means it has more staying power, but then again, that is expected for the price you pay for it.

To conclude, it would almost be a sin if you didn't go out and buy this foundation, as it is a great all rounder. You could wear it all year round due to its light and hydrating texture for the winter and its semi-matte radiant finish for the summer. 

It is a godsend for dry and sensitive, you could pick it up from anywhere, even whilst doing your food shopping, the best part is that it is under £10! 

Have you tried it yet?


SHARE:
Blogger templates by pipdig